 Me too, Pie.
Friday, May 29, 2009
Wednesday, May 27, 2009
The Cheesecake
 Back in the day, "and that day was a Wednesday," I made the 12 1/2 pounds of cream cheese version weekly
I've been making this same recipe ever since I got out of cooking school (a million years ago) and I have no idea where my friend and baking colleague Beth got it, who Judy is, or what exactly makes it so fabulous. And I don't care because it comes out perfect every single time. It's also adaptable; add some melted chocolate or some pumpkin or some lemon zest and Sambuca (you get the idea) and it's a different but still perfect cake. AND it freezes like a dream. Like I said, PERFECT!

2 1/2 lovely pounds of (*gasp!* Wegmans' brand) cream cheese
I've never been a very careful baker. Maybe that's why decorating a wedding cake is my least favorite thing to do. But with cheesecake, there has to be some care taken and I make sure I do it every time.
Before you even start, the cream cheese and the eggs must be room temperature. These ingredients above have been sitting on my counter for 4 hours. Don't let that scare you. Nothing will happen except your cake will be lump-free. You want this.
Now, you make the crust of your choice, pressing it into a springform pan that has been sprayed with Pam and lined in parchment. I don't have a crust recipe here because I don't use one. And my crust is different every time. Sorry.
Onto the rest of the cake!
When I add the sugar and flour to the cream cheese (the first step), I beat the crap out of it. And I scrape the crap out of it. And then I beat the crap out of it again. After that, I handle it as I would a baby---gently, lovingly, carefully. I know. At this point it's already annoying for you whip-it-together-bakers. But honestly, it's worth it.
So then you add the eggs. ONE AT A TIME, with careful, slowish beating until it's completely absorbed. And then you scrape the sides with a spatula and slowlyish beat it again. Then add the next egg, and so on. From here on, the remaining 2 ingredients get added the same way: slowly beat in. Scrape! Slowly beat again.
NOW, you think you're out of the woods with all this carefulness. NO! You may think you've scraped well. MWahahaha! Oh I've been there. But there is always a lump of cream cheese (even if it's small) lurking in there, waiting to plop down on all that creamy goodness, waiting to make a huge nasty crack in the oven. So, you do something a baker never does. You simply pour the batter into your waiting crust and let the residue in the bowl be.
 beautiful, right? Don't be fooled. There could still be some lumpiness in that bowl.
Here's where you're salivating child/husband/dog comes in. Give them the bowl and the spatula. They'll scrape it alright. Right into there quivering-with-anticipation lips. Yeah, yeah, I know there are raw eggs that have been sitting on a counter for 4 hours in there. What can I say, I buy fresh eggs regularly and then I live dangerously.
Okay, you're almost there. Put it in a ridiculously low oven (the temperature in the recipe is not a typo and if you have a convection oven it's lower), set your timer for 1 hour, pour yourself a glass of something, pick up a book, and lie down on the couch. Or whatever it is you do when you're not baking. I rest.
When the timer goes off, you may peek at your cake. You might not be ready to take it out yet. Don't panic. Every oven is different. The way you'll know if it's done if it the edges have started to brown and the middle of the cake quivers a little bit (sort of in a jello-y way). If it really REALLY looks loose, close the door, pick up your book again, and set the timer for 10 more minutes.
When it IS only quivering a bit, turn off your oven. Don't take it out of the oven. Now this next part sounds weird, but it's important. You may think "Ha-HA. No cracks! I'm home-free. NO PROBLEM."
This is what the cheesecake wants you to think.
The next very important step is to take a non-serrated knife (a cake icing metal spatula is the perfect tool for this) and carefully place the tip along the edge of the cake, making sure it goes to bottom of the pan AND the side touches the side of the pan on the inside. Oh-so-carefully, making sure the edge of the knife keeps dragging along the edge of the pan, you drag the knife all the way around the circle of the cake. You're basically trying to free the edges of the cake, crust and all, from the sides of the pan. If you don't do that, as the cake cooks, the sides of the cake will adhere to the side of the pan and pull the center, making the dreaded crack.
Then close the door, leaving the cake inside, pick up your book and beverage of choice and go back to the couch. Your cake should sit inside for at least another 20 minutes.

I know that looks like a crack. It is. BUT IT'S TINY.
Now you can take it out of the oven. Put it in the fridge, brush your teeth, and try not to wake your snoring husband when you get into bed unless you want to. You are, after all, well-rested. teeheehee
Next day you'll thrill at the site or your cake. Really. You will! Now you'll see why it's all worth it, even before tasting it. Your cake is now a tough guy. Able to take flipping, freezing, almost anything. Now you take a piece of cardboard (I have cake boards) or a plate and place it on top of your cheesecake. Don't worry. It can take it. Flip it over and take the bottom of the pan off. It'll come off with no problem because you've lined the bottom of it with parchment paper. Parchment paper is as important to baking as butter and decent pans. Peel off said parchment to reveal the cakes lovely brown bottom *snort*.

Now take your serving platter, put it on top of the exposed cake bottom (teehee) and flip it right-side-up. Now you can do lots of different things with. Top it with fresh fruit and an apricot glaze. Pour some ganache on top and let it drip down the sides. Or, do as I did today and keep it nude, simply wrap it in plastic, making sure to adhere plastic wrap to the sides tightly, and throw it in your freezer, telling your poor son he will DEFINITELY get the first piece a month from now.

Behold! A bad picture but a still-lovely cake.
Judy's Cheesecake
Judy's Cheesecake
makes one 10-inch cake
2 1/2 pounds cream cheese, room temperature
1 3/4 cups sugar
3 tablespoons flour
5 whole eggs plus 2 yolks, room temperature
1 teaspoon vanilla
1/4 cup heavy cream
Preheat oven to 285 degrees (250 degrees if a convection).
Combine cream cheese, sugar, and flour and beat until smooth and creamy. Add eggs and yolks, one at a time, scraping well in between each egg. Add vanilla and heavy cream, beating carefully until smooth.
Pour into prepared crust. Bake 1 hour or until top is only slightly quivering. Turn oven off and leave cake in the oven 20 minutes. Refrigerate cake overnight.
Variations:
Lemon-Sambuca: add 1/4 cup lemon juice, 1/3 cup Sambuca, and 2 teaspoons lemon zest
Pumpkin Marble: add 1/3 cup pumpkin, 1/2 teaspoon cinnamon, 1/4 teaspoon ginger, and 1/4 teaspoon nutmeg to 2/3 of the plain batter. Pour alternating pumpkin and plain batters into pan and swirl slightly to marblize.
Tuesday, May 26, 2009
How to Bar Mitzvah on a Budget: Part Two::The Centerpieces
Here's where I show that I'm actually doing some of the things I talked about in Part One! And I've been having way too much fun doing it!
I often say that I'm creative but not original. I can imitate/copy almost anyone in drawing, crafting, etc., but don't come up with ideas on my own. Until now! Check it out!
I often say that I'm creative but not original. I can imitate/copy almost anyone in drawing, crafting, etc., but don't come up with ideas on my own. Until now! Check it out!
 Red Sox Nation! in GUMBALLS!!
IKEA pot filled with a Styrofoam cube, a dowel hot glue-wrapped in three colors of curling ribbon, a Red Sox mint canister from Wegmans , paper "grass", a 'B' painted and glued to a skewer (also painted), a gumball and Hot Tamale-covered Styrofoam ball and star stuff to wrap around and fill in the holes! Everything hot-glued within an inch of its life!
I have 8 of those IKEA pots, so I made 4 more candy-constructed centerpieces: 2 Simpsons-themed ones and 2 with a triangle-shaped styro form covered in green--Sam's favorite color--candy (including Skittles with the S's showing) with green star garland and Stairway to Heaven sheet music as a base filler along with green tissue paper. To the top of each green cone I glued a large wooden S that I spray painted black and sprinkled with glitter. The remaining 2IKEA pots will have candy button paper glued around the top edge (hot glue!) and some hot pink and yellow Zinnias planted in them. Basically because I've run out of candy ideas and can't think of how to recreate the XBox in a centerpiece.
OTHER centerpieces I did crib from a blog about weddings. The couple were self-confessed book nerds so they had piles of books as their centerpieces. Because Sam is doing a mitzvah project for our public library and collecting used books from his guests to donate to the library's book sale, this idea was perfect. And behold!
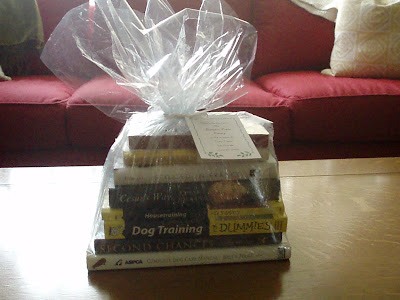
this one is dog-themed
My second favorite craft supply right now is shrink wrap! All you do is wrap stuff with it (ANYTHING) and then use your hairdryer to heat it and shrink it. AWESOME. The dog is lucky he didn't get shrink-wrapped because it is sooooooo much fun! I finished each off with a beautiful brown wired ribbon in a nice big bow.
My second favorite craft supply right now is shrink wrap! All you do is wrap stuff with it (ANYTHING) and then use your hairdryer to heat it and shrink it. AWESOME. The dog is lucky he didn't get shrink-wrapped because it is sooooooo much fun! I finished each off with a beautiful brown wired ribbon in a nice big bow.
That stack is actually one of my least favorites. I got more daring (I'm so crazy!) with the others and made bigger stacks. I made a HUGE one full of kids' books that will serve as a centerpiece on the bimah which is like a stage in a synagogue. Flowers are lovely, but this is free, appropriate, and very Sam.
After tying the big brown bow on each centerpiece, I affixed these little signs made out of card stock and printed on my computer:

I've also been doing a TON of baking. Sam said his least favorite 5 words in the English language are "it's for the bar mitzvah" whenever I tell him what smells yummy! In fact, I've got a cheesecake in the oven as we speak (at 12 am!). It's the best cheesecake ever and I'm going to post the recipe next time.
Monday, May 4, 2009

Before S started middle school the questions began: Are you worried? Do you think it'll be safe? Do you wish he was going to the other school? My answer was always No to all three questions. Yes, I was worried, but not for the reasons they meant. Middle school is a living hell for a lot of kids and just extremely uncomfortable for some. How would he navigate new social situations? Would he still be a "good boy" or try on some new bad-ass clothes?
These questions were asked, for the most part, by good people, all parents from S's elementary school. Most of them were people you would want to be friends with. People who would never consider themselves to be intolerant. Your average everyday nice white person.
Our elementary school's idea of diversity is the recent array of Asian students who have begun to arrive. A good portion of the school would probably be classified as upper middle class. While we do have some families in need, the school and the school's PTA is well-funded. Not so with the middle school S attends. His middle school has a real cross-population of our community: "well to do," working class city kids, and people from public housing.
It's like real life and I love it.
So today when I dropped S off at school, my heart got a little lift from seeing him walk over to a group of kids as diverse as our country. My peachy white boy slapped hands with another boy with milk chocolate skin who was talking to another the color of mahogany. All were laughing, all were welcome. It was a beautiful thing to see.
But the most amazing part of it is the idea that maybe my children won't even notice how great it is, that this is just the way the world is. Colorful and beautiful.
Friday, May 1, 2009

My little baby boy (who is almost 5'10" with size 12 1/2 shoes) is right now, as we speak, snuggling on the couch with his girlfriend and watching the romantic classic, Adam Sandler's The Longest Yard.
How did this happen? When I am STILL 25 YEARS OLD??
Subscribe to:
Posts (Atom)